Elasticsearch and Kibana for Information Retrieval
A minimal example of using markdown with fastpages.
Elasticsearch and Kibana for Information Retrieval
Objectives
The objectives of this lab are:
- to explore the basic functionality of a state-of-the-art IR system; and
- to compare the retrieval effectiveness of BM25.
Approach
You will install and run Elasticsearch and employ a console available on Kibana to load and search our document collections (Documents and IRDocuments).
To install Elasticsearch and Kibana, goto this page.
Elasticsearch
In the previous labs we have used a simple stand-alone retrieval engine. This has been great to allow us to easily try different approaches to indexing. However, it is not suitable for real production applications because it is not optimised to scale for large volume data in a cloud computing, client-server architecture. There are 2 widely used, open-source IR systems that can scale to massive volume applications. These are Apache Solr (https://lucene.apache.org/solr/) and the more recent ElasticSearch (https://www.elastic.co). Both are built in Java, based on an IR engine called Lucene, and provide a server-side IR system that can be accessed via a REST API. ElasticSearch has become the industry standard for new applications.
ElasticSearch (ES) is a distributed, open source search and analytics engine for all types of data, including textual, numerical, geospatial, structured, and unstructured. Its speed and scalability along with the ability to index many types of content mean that it can be used for a wide range of applications. Core to its performance is an inverted index very similar to those we have already seen.
Kibana is a data visualization and management tool for Elasticsearch that provides real-time histograms, line graphs, pie charts, and maps. It also contains a simple console that we will use to interact with the ES API using JSON data format.
Install and Run ElasticSearch and Kibana
-
If you navigate to the Maths + Statistics folder in the AllPrograms section of your startup menu, you should find ElasticSearch and Kibana already downloaded and installed.
-
Click first on the ElasticSearch folder to run the .bat file. You should see a command line interface open up as ElasticSearch starts up and runs in the background on a local server on your desktop.
-
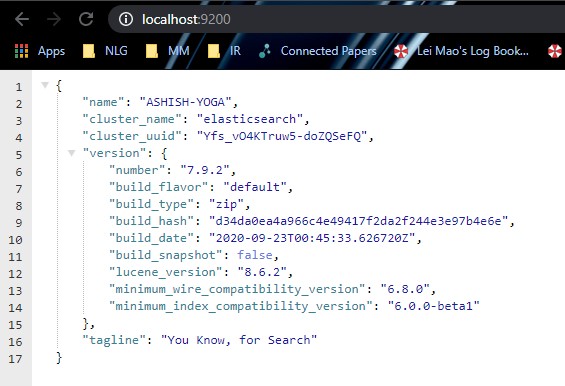
Go to http://localhost:9200/ and you should see something like this:
- Now select the Kibana folder to run the .bat file. It should now open in the command line window. Point your browser at http://localhost:5601 and you should see something like this:
On the top-left corner, click the three parallel lines (≡) to open the menu. Now scroll-down to find the Dev Tools option under Management section. Click it to go to the console where we will be writing the queries.
In a production system Elasticsearch would typically run on a cloud server with client side JavaScript applications passing information back and fore in JSON data format to the API made available by Elasticsearch. The Kibana console allows us to simulate sending requests (in the left-hand pane) and receiving answers (in the right-hand pane). This allows us to explore Elasticsearch without building the frontend application
ElasticSearch is open source and can be installed on your own machine. Check out this page for information on installing on Windows.
Add Individual Documents to the Index
First ensure that an Elasticsearch instance is running on http://localhost:9200 and a Kibana instance is running on http://localhost:5601.
As we have a clean Elasticsearch instance initialized and running, the first thing we are going to do is to add documents to an index and then retrieve them. Documents in Elasticsearch are represented in JSON format.
We are adding now to the index named irdocuments (the index name should be in lowercase only) a document having the id 1; since the index does not exist yet, Elasticsearch will automatically create it.
Run the following query in the Kibana console by clicking the green play-button:
POST irdocuments/_doc/1
{
	"title": "Document 1",
	"content": "The cat sat on the mat next to the cat."
}
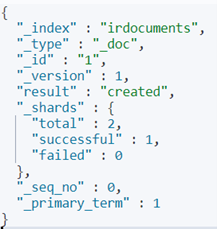
The response on the right should be something like this (if you copy and paste watch out for quotation mark errors):
Verify that the document has been added trying:
GET irdocuments/_doc/1
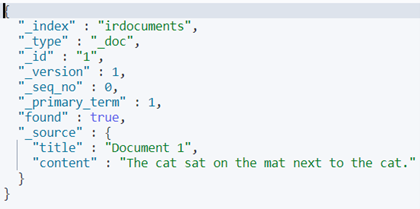
The response should be like this:
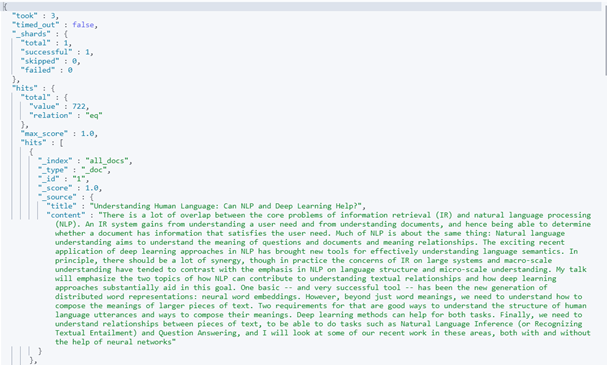
Add the other 3 documents from IRDocuments and verify they have been added. You can try the following query to retrieve all the documents from the index irdocuments:
GET irdocuments/_search
{
	"query": {
		"match_all": {}
	}
}
Try:
GET irdocuments/_count
to count documents in the index.
Let’s delete document 1 and index a new doc with the text “The white cat sat on the mat next to the black cat.” Verify the result.
To delete a document from the index, run this query:
DELETE irdocuments/_doc/1
Now you can delete the whole index by running:
DELETE irdocuments
Verify you have been successful.
Indexing a Set of Documents in Elasticsearch
Elasticsearch offers a Bulk API that allows us to perform add, delete, update and create operations in bulk for many documents at a time. Since the documents in Elasticsearch are represented in JSON format, we first need to convert our txt files into a predefined JSON format. This has already been done for us for our larger dataset with a python script (see Appendix-Py-script), the output of which is available as all_docs.json in lab resources on Moodle.
To get more insight for Bulk API please visit this link.
Let’s get this data into Elasticsearch. Since the body of these requests can be big, it is recommended to do this via a tool that allows to load the body of a request from a file - for instance, using curl. Open a command prompt and navigate to the folder where all_docs.json file is saved. Run the following command:
curl -H "Content-Type: application/x-ndjson" -XPOST "localhost:9200/documents/_bulk?pretty" --data-binary @all_docs.json
This command will index all these documents to an index named documents. Be patient, it can take a while to upload the json. Verify the indexing by running the following query:
GET irdocuments/_search
{
	"query": {
		"match_all": {}
	}
}
Compare the result here with the result you got previous time running this query (for individual documents). You’ll only get top 10 results from this query.
Queries in Elasticsearch
Boolean
Let’s start with Boolean queries. In the boolean query, there are four kinds of occurrences: must, should, must_not and filter. must mimics the boolean “AND”. For example, if we are searching for documents with “case-base” in content and with “deep learning” in title, try the bool DSL query:
GET documents/_search
{
  "query" : {
    "bool" : {
      "must": [{
          "match": {
              "content": "case-based"
          }
      }, {
          "match": {
              "title": "deep learning"
          }
      }]
    }
  }
}
Try describing this query in Boolean Logic.
The functionality of should somewhat corresponds to the Boolean “OR”. Let’s look at an example, assume you want to search for either “NLP” or “deep learning” in the title, and if either of the criteria matches the document should be returned with the result. The query might look like:
GET documents/_search
{
  "query" : {
    "bool" : {
      "should": [{
          "match": {
              "title": "deep learning"
          }
      }, {
          "match": {
              "title": "nlp"
          }
      }]
    }
  }
}
Again try describing this query in Boolean Logic.
Try some queries using should and filter. Note filter can be used effectively with numeric data but is also quite similar to must, in that the term has to appear in the document; however, they do not contribute to the score.
Basic information on search is available at https://www.elastic.co/guide/en/elasticsearch/reference/7.0/getting-started-search.html
Ranked queries with BM25
It is easy to perform ranked queries. The scores are based on the BM25 algorithm by default using the standard analyser (however, you can change to alternative models by setting up a custom analyser, see Appendix for more details).
For example, a ranked query for documents about “deep learning” can be written as:
GET documents/_search
{
  "query": {"match": {"content": "deep learning"}}
}
Note the documents are ranked by score:
- Try this query but replace “match” with “match_phrase”. Compare the results.
- Now try one of the queries from the completed AnalysisHandout sheet from the coursework. Compare the results from tf, idf, and tf*idf with those obtained here.
We have just touched the surface of the functionality available in ElasticSearch today. You will find more detailed information about Elasticsearch at this link.
Appendix-Analyzers
You can add different types of analyzers in your index in Elasticsearch. For example, applying a stop word removal on your index.
To define an analyser in an index, we need to first define the mappings here. For this, run the following command on Kibana console:
PUT documents/
{
 "settings": {
   "analysis": {
     "analyzer": {
       "my_analyzer": {
         "type":       "stop",
         "stopwords":  "_english_"
       }
     }
   }
 },
 "mappings": {
   "properties": {
     "title":    { "type": "text" },
     "content": { "type": "text", "analyzer": "my_analyzer"
     }
    }
  }
}
Make sure there is no other existing index with name documnets. Now let’s add some data to the index documents. Open a command prompt, navigate to the folder where the JSON file name all_docs.json (from indexing example) is saved. Run the following command to add the JSON to our index.
curl -H "Content-Type: application/x-ndjson" -XPOST "localhost:9200/documents/_bulk?pretty" --data-binary @all_docs.json
Go to Kibana console and run following command to verify the indexing:
GET documents/_search
{
  "query": {
    "match_all": {}
  }
}
You should see the indexed files here.
Now to verify the stop-word removal from indexing run the following command:
GET /documents/_search
{
  "query": {
    "match": {
      "content": "the"
    }
  }
}
You should see a result with 0 hits, because word “the” is not indexed here.
You can also customize the analyzers according to your use. Let’s say you want to apply an html filter as an analyser. You would need to create new mapping on different index. Changing the mapping of an existing field could invalidate data that’s already indexed. If you need to change the mapping of a field, create a new index with the correct mappings and re-index your data into that index.
Let’s make a different index named irdocuments. Run the following command:
PUT irdocuments/
{
 "settings": {
   "analysis": {
     "analyzer": {
       "blogs_analyzer": {
         "type": "custom",
         "tokenizer": "standard",
         "stopwords": "_english_",
         "char_filter": "html_strip",
         "filter": [
	    "stop",
            "lowercase",
            "asciifolding"
         ]
       }
     }
   }
 },
 "mappings": {
   "properties": {
     "title":    { "type": "text" },
     "content": { "type": "text", "analyzer": "blogs_analyzer" }
    }
  }
}
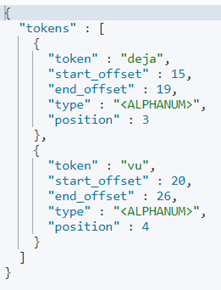
Let’s run an example query to verify our analyser:
POST irdocuments/_analyze
{
  "analyzer": "blogs_analyzer",
  "text": "is this the <b>déjà vu</b>?."
}
The result should show only two words: [deja, vu]
Appendix-Py-Script
import json, os, re

txt_files = "C:\\Users\\User\\Downloads\\CourseworkResourses\\CourseworkResourses\\Documents\\"

ctr = 1
j = []

for txt in os.listdir(txt_files):
    s1 = ""
    s2 = ""
    print(ctr)
    f = open(txt_files + txt, "r")

    l = f.readlines()

    lines = list(filter(lambda x: not x.isspace(), l))

    t = lines[2]
    tt = t.strip('\n')

    s1 = "{\"index\":{\"_id\":" + "\"" + str(ctr) + "\"" +  "}}"

    ctr += 1
    for i in lines:
        if i[0] == "#":
            ii = i.replace('"', '')
            iii = ii.strip('\n')
            iv = iii.replace('#', '')
            s2 = "{\"title\":\"" + tt + "\", \"content\":" + "\"" + str(iv) + "\"" + "}"

    with open("all_docs.json", "a") as the_file:
        the_file.write(s1 + "\n")
        the_file.write(s2 + "\n")